DIY Air
Intake!
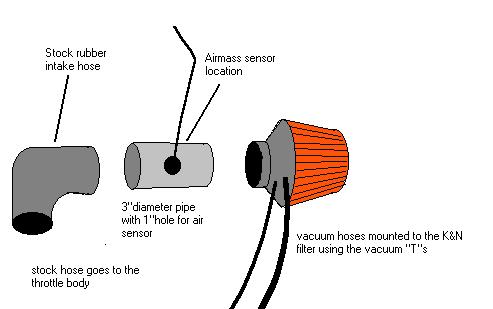
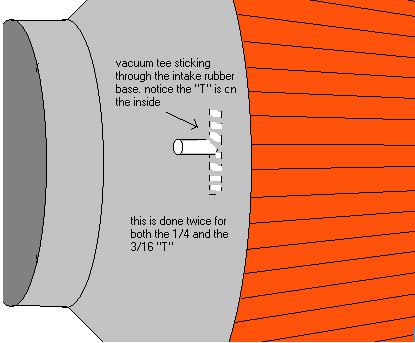
1) Materials - 1 - drill with 1" "bit" (I dont know what those large hole drill bits) 1/4" bit, and a 1/8" bit 2 - 2" screws for mounting the airmass sensor in the pipe 1 - K&N open element air filter for a 3" pipe (I got mine from NOPI) see picture 1 - 4" long 3"diameter pipe (preferably stainless) 1 - 3/16 inch vacuum "T" 1 - 1/4 inch vacuum "T" and a lot of time to fit it all together.... :) this will definitely be a learning exp. First remove the stock airbox. This is easy to do and you don’t really have to disconnect anything except the airmass sensor. All of the sensors that are mounted to the airbox you can remove and just let them hang for now. The two vacuum hoses on the SIDE of the airbox will be mounted IN the air filter. Now there are two hoses mounted on the BOTTOM of the airbox, those can be removed from the airbox. The hose that goes to the sensor can be removed from the sensor and the hose that goes from the intake manifold to the airbox can be plugged directly into the sensor. air sensor - get a 4"long piece of 3"diameter pipe. cut a 1" hole in the middle of it - I used a drill with a hole puncher. This is where the air sensor is going to be mounted. get a hammer and beat down the higher part of the hole so the hole is flatter (this makes it a little easier to mount the air sensor without any leaks). Get some rubber pipe (any auto parts store, about Ľ" thick) and cut out a 2" square piece. cut a 1" hole in the middle of it. stick the airmass sensor through that. put the airmass into the pipe and mark where the mounting hole on the sensor are and drill a small hole for the mounting screws. I had to trim the rubber in certain areas in order to get a good seal between it and the pipe, so you might want to get some extra rubber pipe incase of mistakes. air filter - drill two holes into the top of the air filter right through the rubber - NOT through the mounting area (3" area) but through the thick rubber base of the filter. Now here it can be tricky, so use your judgment as to where to drill. this is where those two hoses that feed from the SIDE of the air box are going to be mounted. stick the vacuum "T"'s through this (from the inside sticking out) so the "T" part is on the inside and so there are two vacuum mounts sticking out from the filter (wish I had a picture for this) – one for the smaller hose and one for the larger hose. The filter should come with a hose clamp that will fit it to the pipe. It is actually easier to fit the pipe to the stock intake hose, then fit the air filter to the pipe. All of the sensors that are mounted to the stock airbox are to be mounted to something else. I used the stock plastic part that is in front of the airbox for a mounting place. Of course I drove around for awhile with the sensors just dangling around… but I don’t recommend this as they might get whacked by the cooling fans….
NOTES: Driving with this setup will be odd at first as my car took a few seconds longer to start and when I tried to take off it will stumble a little bit because of the different throttle feel. BUT ACCELLERATION WILL NOT SUFFER. If acceleration suffers then you might want to check the two hoses that feed from the air filter (large one and the small one). The stumbling is caused by the elimination of the vacuum canister on the bottom of the airbox (remember eliminating the hose from the bottom of the airbox to the sensor? That was the vacuum canister molded into the airbox). This hesitation will clear up within a week of driving. By Starquest AKA Andy R
|